CommonSpot: How to Upload and Link New Documents
Upload & Link Option 1:
(Best option if
uploading multiple documents)
Follow the below
steps to Upload…
- Click New > Uploaded Document from
the My CommonSpot primary menu bar.
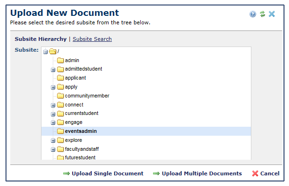
- From the Upload New Document window, choose
the subsite where your document will reside and whether you want to upload
single or multiple documents.
- Single Document:
o
Click the Upload Single Document
link.
o For the Local Filename, browse to find the document you want to upload, click Open.
o
Enter the remaining standard properties (Title,
Category, Publication and Expiration Date), click Save.
Note: be sure to choose ‘Other Documents’
as the category.
- Multiple Documents:
o
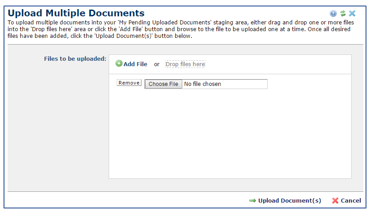
Click the Upload Multiple Documents
link.
o
Click the Add File link, then Browse
to find the document you want to upload, click Open. Repeat steps until
all documents are added.
o
Click the Upload Document(s) link,
a prompt will appear giving the upload status.
If successful, click Next.
o
From the My Pending Uploaded Documents
window, enter the Title and Description for each document.
o
Select the checkboxes next to each document
and click the Enter Properties link.
Note: If selecting multiple documents at once, these properties will
apply to all that were checked.
o
Enter the requested standard properties (Category,
Publication
& Expiration Date) - make sure to choose ‘Other Documents’ for the
category. Click Save.
o
Click to Close the Upload Status window
confirming successful upload.
Follow the below
steps to Link…
- Open the page you want to link a document to
in author mode (View > Work on this Page). Note: documents must be uploaded
before you can link, be sure to follow the above steps before proceeding to
link.
- Click on the Formatted Text Block
element action icon (gear), choose Text to open the Rich Text Editor.
- In the editable region of the editor, enter
the text that will be used to link your document.
- Highlight the text and choose the Link
icon from the toolbar.
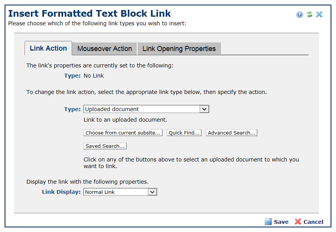
- From the Insert Formatted Text Block Link
window, observe 3 tabs - Link Action, Mouseover Action, and Link
Opening Properties.
o
From the Link Action tab:
§ Click
the Type
drop down menu and choose Uploaded Document.
·
If the document was uploaded to the same
subsite as the page you are on, click the Choose from current subsite button, select
the document from the list and click the Use Highlighted Content link.
·
If the document is not located in the same
subsite, click Quick Find, enter search criteria, and click Search. From the Choose Uploaded Document – Search Results
window, select the document from the list and click the Use Highlighted Content link.
§ Clicking
the Link
Display drop down menu changes how the link looks, however, we do not
recommend making any changes, please leave default.
o
From the Mouseover Action tab:
§ We
do not recommend making any changes to these properties, please leave default.
o
From the Link Opening Properties tab:
§ Choose
how your link is opened, by default it is set to ‘Open link in current window,
replacing current page’, you can leave this default or change to ‘Open
link in a new tab or window’.
- Click Save.
- Click Save to close out of the Formatted
Text Block window.
- Click orange Preview button in upper
right corner and test your new link.
Upload & Link Option 2:
(Best option if only
need to upload single document)
- Open the page you want to link a document to in
author mode (View > Work on this Page).
- Click on the Formatted Text Block
element action icon (gear), choose Text to open the Rich Text Editor.
- In the editable region of the editor, enter
the text that will be used to link your document.
- Highlight the text and choose the Link
icon from the toolbar.
- From the Insert Formatted Text Block Link
window, observe 3 tabs- Link Action, Mouseover Action, and Link
Opening Properties.
o From the Link Action tab:
§ Click
the Type
drop down menu and choose New Uploaded Document.
§ If
needed, you can change the Destination Subsite for where the
document will be uploaded. (Click Change, choose subsite, Click Next).
§ Clicking
the Link
Display drop down menu changes how the link looks, however, we do not
recommend making any changes, please leave default.
o
From the Mouseover Action tab:
§ We
do not recommend making any changes to these properties, please leave default.
o
From the Link Opening Properties tab:
§ Choose
how your link is opened, by default it is set to ‘Open link in current window,
replacing current page’, you can leave this default or change to ‘Open
link in a new tab or window’.
- Click Next.
- For the Local Filename, browse to
find the document you want to upload, click Open.
- Enter the remaining standard properties (Title,
Category, Publication and Expiration Date), click Save. Note: be sure to choose ‘Other Documents’ as the category.
- Click Save to close out of the Formatted Text Block window.
- Click orange Preview button in upper right corner and test your new link.
*See related KB article -
'How to Upload
New Versions of Existing Documents'.
Check out the How To video:
Note: when uploading a
document into CommonSpot, it keeps the file name which becomes the link. If you upload additional documents with the
same name, it will append _1, _2, etc.
You are not replacing a document by uploading it again. If you need to replace an existing document,
see KB article “How to Upload New Version of Existing Document’.


