CommonSpot: How to Upload New Versions of Existing Images
Option 1:
If you don’t
know the image filename, but you uploaded it originally, do the following:
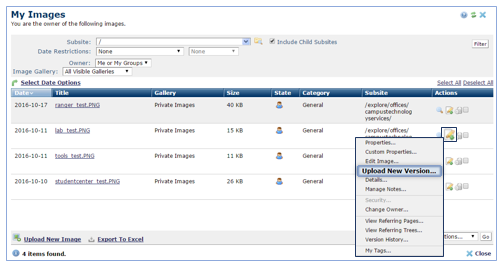
- Open My Content > My Images from the
My CommonSpot primary menu bar.
- Find your image and click the More
Actions icon from the Actions column. Choose Upload
New Version from the appearing menu.
- From the Upload New Version window, click Browse/Choose File
to locate the new version of your image, click Open, and then Save. If needed, change any of the existing
information for title, description, category or keywords. Note: it will append a _1, _2, etc to
indicate what revision it is. So if you
uploaded the same image, with the same name called ‘image’ for a 3rd
time, it would show ‘image’_3.
Option 2:
If you did
not upload the original image, do the following:
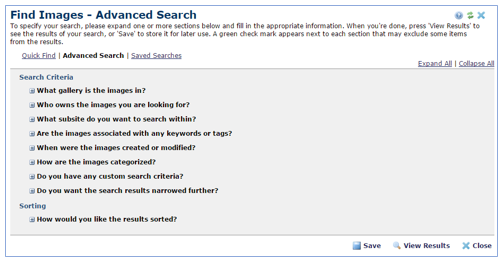
- Open the Tools menu, and then choose Find
Images.
- Click Advanced Search from the Find Images window. Expand and answer search criteria questions to fill in as much information you can about the image.
- Click View Results.
- Find your image and click the More
Actions icon. Choose Upload New Version from the
appearing menu.
- From the Upload New Version window, click Browse/Choose File to locate the new version of your image, click Open, and then Save. If needed, change any of the existing
information for description, category or keywords. Note: it will append a _1, _2, etc to
indicate what revision it is. So if you
uploaded the same image, with the same name called ‘image’ for a 3rd
time, it would show ‘image’_3.
*See related KB article - 'How to Add, Modify and Delete Images'.
Check out the How To video:


